Things to make
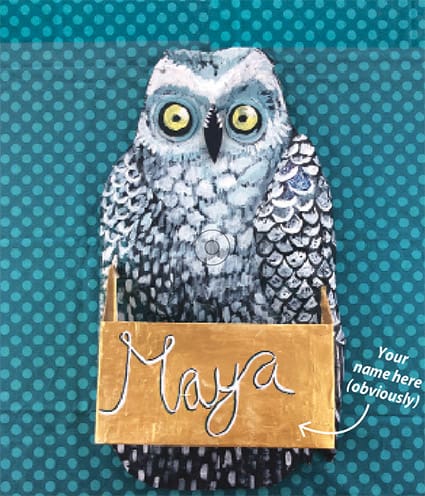
A snowy owl post box
This snowy owl will store your post and your AQUILA magazine in style.
You will need:
Thick corrugated cardboard
Pen
Scissors
Strong PVA glue
Large empty cereal box
Masking tape
Newspaper
Acrylic paints, including gold
Ribbon
Strong tape
Make the owl
1 Draw your owl shape onto a large piece of thick corrugated cardboard. It needs to be a little bit wider than the width of your cereal box.

2 Cut it out.
(Tip: This bit needs to be strong, so you might like to cut out two owl shapes and stick them together.)
3 For the owl’s features, draw two large circles, two smaller circles and a leaf shape onto thick card, and cut them out.

4 Stick the small circles onto the big ones. These will be the eyes.

5 Stick the eyes and the beak onto your owl shape.

6 Take a large empty cereal box and cut it like so – see picture.

7 With strong PVA glue, stick the cereal box to the front of the owl.

8 Take a large sheet of newspaper and twist it to make a sausage shape. Tape it above the owl’s eyes to make a brow. Then use more newspaper and more tape to build out its wing.

9 Using the usual method (we’re sure you know it by now) cover the whole surface with three layers of papier mâché over the whole surface. Leave to dry completely.

Painting your owl
You can paint your owl however you like. You could have a look at some images online and come up with your own technique, or you could choose to do it like this. We promise it’s not as tricky as it looks.
You’ll need FIVE colours:
Yellow
White
Dark green/blue
Light green/blue
Gold
1 Paint the entire surface of the owl dark green (We didn’t have a dark green paint, so we mixed brown and dark blue together). The post box stays blank for now. Leave to dry.
2 With a dry brush cover the owl’s body with little white dashes.

3 On the wings, paint over the dashes with little crescent/scale shapes – see picture for reference. It looks more realistic if it’s not too neat.

4 On the owl’s breast, paint white cloud shapes over the dashes.

5 The area around the eyes is light green with white dashes for feathers. The eyes are yellow with white highlights.

6 Paint the post box gold for a majestic touch.
7 When it’s all dry, paint your name on the front with a thin detail brush. Highlight with a permanent marker for added definition.
Attaching the ribbon
Take a length of bright-coloured ribbon (about 30 cm will do), knot it and tape it to the back of your owl. Then cut a little square of cardboard and glue it on top of the tape (for added strength).

You can hang up your snowy owl post box and use it to store the latest copy of AQUILA. Awesome or what?
Copyright © New Leaf Publishing / AQUILA 2017